While few individuals have a hardware scanner, many people have iPhones or iPads—and these devices have scanning capabilities, which is not widely known. Follow the instructions below to learn how you can convert a piece of paper into digital format simply by using your device.
Scan Directly with an iPhone or iPad
Scanning with your iPhone or iPad is made possible by the Files app, which allows you to scan one or more pages and save a PDF anywhere you like. It’s particularly easy to use iCloud Drive with Files, so utilizing the app is a good way to create a file you can work with later, on your Mac. (While you can also scan into the Notes app, Notes is mostly useful for storing information rather than creating files.)
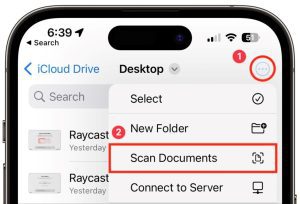
- Open the Files app, tap Browse in the toolbar, and navigate to the folder where you want to save the scanned document.
- Tap the icon in the upper right and select Scan Documents.
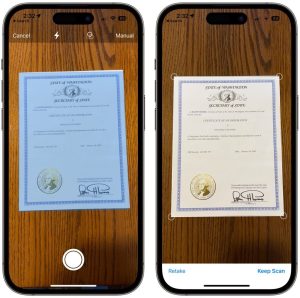
- The camera viewfinder will appear. At the top of the screen, note the controls for the flash, the color filter, and the Auto/Manual toggle. Tap Auto to switch to Manual; we recommend using Manual until you are fluid enough with the controls to let your device scan for you. You can turn the flash on or off, and choose a color filter, such as grayscale or black-and-white.
- Hold your device steady so it can detect the edges of the paper, then tap the white shutter button to take a photo. In Auto mode, the app will just keep taking images for you, which can be efficient with multiple pages, but also problematic when you are not ready.
- Examine the scan to see if it looks good. You can adjust the selection by dragging the corners, or tap Retake for a do-over if needed. When you are happy with the scan, tap Keep Scan.
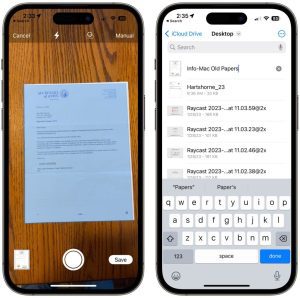
- To scan additional pages, place them in the viewfinder and repeat step 4 and step 5. Once done, tap Save and choose a name for your file.
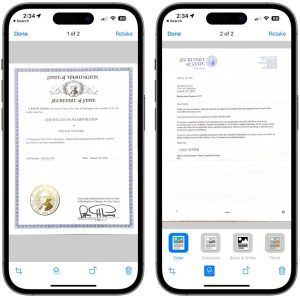
- If you would like to make further changes to your scan, tap the image to the left of the shutter button. On the edit page, the crop icon returns you to the previous screen to adjust the corners again, and the color filter icon lets you choose Color, Grayscale, Black-and-White, or Photo. Tap the rotate icon if the document came in with the wrong orientation. You can also just retake the image and tap the trash icon to delete your original attempt. If you scanned multiple documents, you can swipe between them. Tap Done when you are finished, and return to Step 6 to save once more.
Scan to Your Mac with Your iPhone or iPad
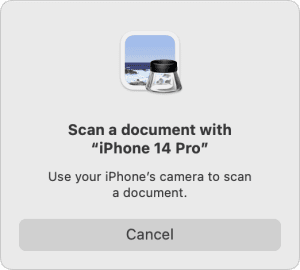
If you would like to scan directly to your Mac (and bypass file sharing services), the Files app allows for this option as well. In Preview on your Mac, choose File, then Import from iPhone, and finally Scan Documents. A dialog will appear on your Mac, and your device will immediately switch to the scanning interface.
From this point, everything works just as though you initiated scanning from your device. Instead of the document being saved to Files, it will appear as a new document in Preview. You can then work with it like any other PDF, and save it anywhere you choose.
Final Thoughts
One caveat to scanning documents using your iPhone or iPad is that this approach does not do optical character recognition (OCR), which makes the scanned text selectable; the resulting PDF pages are just images. Some online tools can perform OCR on a PDF, such as AvePDF’s OCR PDF tool, though it may not be advisable for use with sensitive documents.
An additional caution to take note of is that scanned documents tend to be large. If needed, online PDF compression tools can shrink files—AvePDF also has a Hyper-Compress PDFs tool to compress documents by as much as 90 percent.
Overall, a hardware scanner—especially a flatbed—will result in better quality scans, because:
- it is easier to position the pages.
- the light is stronger and more even.
- there is no need to straighten the scanned page images (which Apple’s software attempts to do when you’re not directly over the page).
But when quality isn’t paramount, a quick scan with your device offers hard-to-beat ease and convenience. MC Services also makes technology easy—contact us to learn more about how we make IT applicable and approachable to everyday business professionals like you!
(Featured image by Adam Engst)
